Bread Makers give you homemade bread or dough at the push of a button. You've probably noticed I'm a fan of the humble bread maker. What I can't understand is why many chefs and professionals don't like bread-making machines. To me, it seems somewhat irrational given the amount of automation in professional kitchens. For home cooks, they can save a lot of time for either preparing dough or making a loaf.
Did you know: Even many premium quality commercially made breads use a mix where the flour and the gluten protein are often separated and then combined during mixing. Very few breads are made the way we'd make them at home. I guess this gives more certainty around baking process (not a surprise that the process for making 10,000 loaves is different to making one).
How bread-makers works
Whether you're a seasoned baker or just starting out, a bread maker can simplify the process of making fresh, delicious bread at home. Let’s explore how these machines work and how to get the most out of yours.
The component parts
The below infographic shows the main parts of the machine, please do forgive the somewhat elementary drawing.
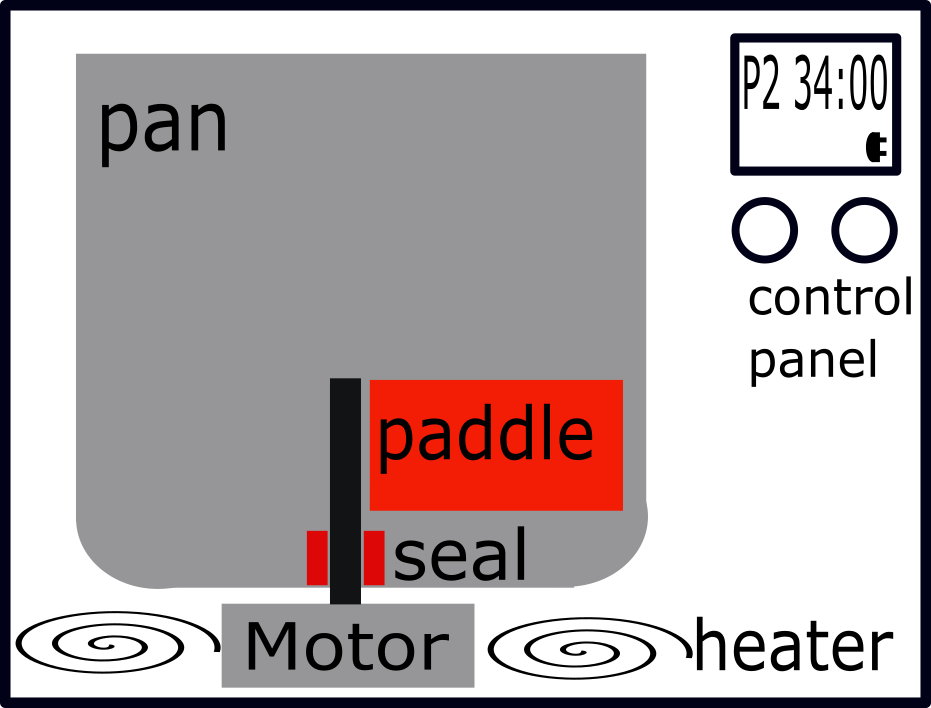
- Bread pan: this pan is generally formed from a material that will heat up quickly, and coated with a good quality non-stick finish. More expensive machines generally have better quality pans. All the ingredients sit in here while they are mixed, proved and later cooked, needless to say the quality of the non-stick coating is paramount.
- Paddle to pan seal: In the diagram there's a seal between the paddle and the pan, this allows the motor which is outside the pan to turn the paddle, of all parts in the bread-maker, this is the most prone to failure. In less expensive machines this is often welded to the pan and therefore cannot be changed. Check if this part looks replaceable before buying a machine.
- Mixing paddle: the paddle is responsible for the mixing, it is connected to the motor at the bottom of the machine and rotates to mix and kneed. Normally, the paddle is removable for separate cleaning. You can get replacement paddles for nearly all bread-makers.
- Heating element: Underneath the baking pan you'll see an electric heating element, this is used for two purposes. Firstly, it keeps the ingredients and the optimum temperature during proving. Secondly, it is used to bake the loaf.
- Motor: The motor is connected to the paddle, as the motor turns it causes the paddle to rotate and mix or kneed the bread. The power of the motor defines how much you can safely mix in one go.
- Control panel: Usually there's some kind of screen with a visual display of what the machine is doing, along with buttons to set the required programme and other options.
An extra note on spare parts, I've had to discard an otherwise working bread-maker in the past because spare parts were not available for it, before buying check spare part availability. This time I went with a Panasonic machine because it looks more serviceable and has parts readily available.
The Bread-Making Cycle:
All bread makers have a number of different programmes, nearly all have methods for making a loaf - plain or wholemeal, and making dough, selectable from a control panel. In this part we look at the automation side.
Automation Explained:
In brief, when we choose a programme, what we're actually doing is enabling a series of steps to take place, with timing between each step. Let's examine these steps in a bit more detail:
For making a full loaf
Mixing → Kneading → Rising → Baking → Cooling
For dough
Mixing → Kneading → Rising
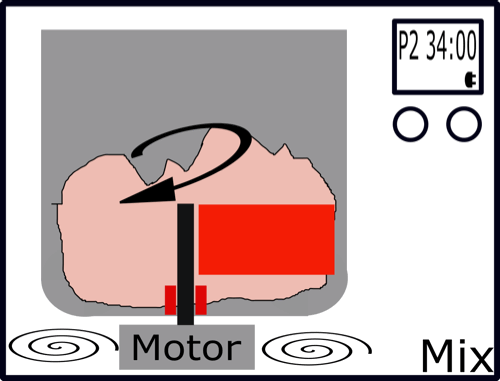
Let's take a simple example programme for a plain flour white loaf:
- Let ingredients reach an even temperature.
- Mix and kneed the ingredients by turning the paddle.
- Wait for the dough to rise (I.E. double in size), keep the baking pan luke-warm using the heater.
- Kneed the ingredients to release the air from the dough.
- Wait for the dough to prove (it should double in this time), keep the baking pan luke-warm using the heater.
- Start the oven and bake the dough into bread.
- Turn off oven, then beep to indicate programme is complete.
We'll come to this below, but an important point to bear in mind is that the bread-maker cannot sense when proving and baking is complete. Therefore, it is important to ensure the right program is chosen for the flour/recipe.
Common Bread Maker Settings
Nearly all modern bread makers will have these settings.
- Basic/White: Use whenever there's 50% or more white flour in the ingredients.
- Whole Wheat: Use only when the recipe is 100% whole wheat, as above, half-and-half recipes generally work better of basic white, as they will over prove on this setting.
- Dough Only: Very useful for pizzas, buns, cobs, baguettes etc.
- Bake Only: I can't say I've ever used this mode, but I guess if the power went out or something near the end of cooking, this could be a useful option.
- Increase/decrease cooking time - Nearly all bread makers can adjust the cooking time, and therefore adjust the darkness of the finished loaf. After a few loaves, you can adjust if needed.
Which flour to use
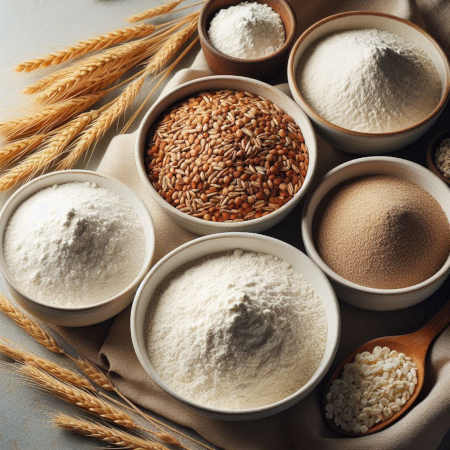
Using the right flour for the right job is critically important to good results.
- For bread, always use strong bread flour, as it has better gluten development. Get the best quality flour you can, it is the main ingredient.
- Most rye flours are suitable for bread-making, I normally use between 25% and an absolute maximum of 50% rye flour in a bread-maker. Some units have separate paddles for rye. Also, add a little extra water for recipes with rye.
- As a rule of thumb, the gluten in strong wheat bread flour makes the dough stretchy. When you move away from wheat flour, the gluten content decreases significantly. I.E. it doesn't stretch easily.
- For pizza, I think bread flour is best, but you can get away with regular plain flour. I've seen recipes using OO flour too. I've personally tried all options (bread, plain, OO) and they all work.
- Only use the wholemeal setting when a recipe uses 100% wholemeal flour. If a recipe has 50% white plain flour, then use the regular setting.
Getting ingredients into the machine
- Measure ingredients by weight for accuracy. This is important for consistent results. Personally, I use a digital scale and carefully weigh most ingredients.
- If you measure flour by volume, you can use the rule of thumb of approximately 120 grams to one cup. But for accuracy, I'd check the weight of one cup as your flour could significantly differ.
- Add liquids first, then dry ingredients, and the yeast last (to avoid premature activation or the salt weakening it).
- Try to avoid opening the lid during kneading or baking.
- Let the bread cool completely before slicing. It's still cooking when hot.
- You can see my other guides on using oils and salts in baking and also what yeasts can be used
Recipes and ratios for bread-making
We have a list of many tried and tested bread-maker recipes, but also most of our regular baking pages also recommend using the bread-maker for dough.
However, if you want to go it alone and come up with your own recipe, follow this guide. Make sure you measure everything accurately, this is key to consistent results. This is the standard bread-making ratio:
- Flour: For a large loaf, around 6-8 buns, or a couple of large pizzas, start with 500 grams or 4 cups of flour.
- Water: Add 60% by volume or weight of water, one gram of water is 1 millilitre. I.E. for 500 grams flour add 300 grams water.
- Salt: For a large loaf I normally add 8 gram of salt. The range here is from about 5 grams - 10 grams.
- Sugar: For white bread, I add a about 1tsp sugar for a large loaf. For wholemeal/rye I'd add maybe 1-1.5tbsp sugar or more.
- Oil/Fat: For this you can use butter or oil, for a large loaf or dough about 10-20 gram of oil or butter. About 1tbsp.
- Yeast: A loaf generally needs 7 gram (one sachet) of fast acting yeast, or about twice as much fresh.
Pizza, I generally make to the regular ratio, and add a bit more oil, and a bit less sugar. We want a stretchy dough.
Focaccia and Ciabatta, use a ratio of about 70% water instead of 60%, when you have to handle the mix wet your hands to avoid sticking.
Why not make it your own by adding seeds, herbs and other ingredients! You could add a handful of mixed seeds or a teaspoon of herbs.
You can also read my guide on common spoon and cup sizes, or use the NutriCherry App conversions page to help you improve the accuracy of adding ingredients.
Troubleshooting & FAQs
If your bread does not come out quite as expected, don't worry, now and again we all have a set-back, but hopefully the below will quickly get you back on track.
Why is my bread dense?
- Not enough liquid: better more liquid than not enough. See the common ratios section.
- Too much flour or too much whole grain flour for the recipe you're using. See the common ratios section.
- Insufficient kneading or rising time, have you used the wrong setting?
Why did it collapse in the middle?
- Too much yeast or liquid: See the common rations section.
- Over-proofing (rising too long): Did you use the wrong setting for this recipe?
- Weak gluten structure: See the section on flours to use.
Bread Has a Hard or Thick Crust
- The bread has overbaked.
- Too much sugar or milk content
- Crust setting too dark
Bread Stuck to the Pan
- Worn-out non-stick coating
- Bread cooled inside the pan for too long
Machine Doesn’t Start or Stops Mid-Cycle
- Power issues or loose plug, if there's a problem with the plug itself, be sure to have a person competent with electrical repairs look at it.
- Timer delay set accidentally. Check if you've set the timer accidentally and reset.
Ingredients Not Mixed Properly
- The Paddle isn't installed correctly: Check it is fully seated and try operating without ingredients to see it turn. Be careful to keep your hands completely clear of the moving parts.
- The mixture looks dry and has not formed a ball shape: Too much flour or other dry ingredients. See the section on ratios.
- The mixture looks wet and sloppy even after first mix complete: Too much water or other liquid ingredients. See the section on ratios.
- Machine overloaded: Consult the manual to ensure you're not overloading the machine.
These may be of interest
- Similar - Tools needed for bread making
- Similar - A few notes for those getting started breadmaking
- Similar - Making bread using yeast
- Similar - Bread maker Olive and Italian herb loaf
- Similar - Bread maker everything rye/spelt/wholemeal loaf
